
Namaste tax dodgers and welcome to this installment
of building a 7’6” paulownia hollow wooden surfboard - A Big Guy Nugget. I wanted to share this
experience with you for the sake of my ego. By now I hear you thinking, good Buddhists
don’t have egos. How right you are Oh wise and noble reader. No one likes a
smart arse so let me please continue. For the record I am an appallingly bad Buddhist
(and person for that matter) with a dodgy self esteem, continually driven by
the fact that Gayle E. repeatedly (and allegedly – added by my lawyer) called
me a stupid moron in grade four (or was it grade 5?) and this event has undermined the
foundational fabric of my self confidence to this day. Bitch! One day I’ll
build a bridge.
I’m not really even a Buddhist but I thought the name Wood
Buddha would elevate my reputation within the international wooden surfboard
building community as a fringe guru wooden surfboard builder, and alternative surf
craft aficionado to the dizzy heights of stardom. I’m also an appallingly bad
husband as well, just ask Mrs Wood Buddha. I’m always “not listening”, “losing
my wallet and my keys to the car”, not wanting to “want to do the dishes”...the
list goes on and on...and I love using “quotes” when I write. It makes me feel intellectually
superior. Whatever! She’s too good for
me anyway, very patient with my bad memory, degraded eyesight, my fat guts and
thick rails. But I was built for comfort not speed. No Usain Bolt , more a
suave, fat, hairy, middle aged chimp. The truth is, that if I wasn’t married to
her, who knows where I’d be. Probably living out of a skip bin, eating discarded KFC zinger scraps, and
habitually annoying decent folks for bus money and half smoked durries, wearing
stained ghosties and smelling like a dead wombat’s arse. How could I not smell like
a dead wombat’s arse if all I ate was discarded KFC zinger scraps. But I digress
and am getting into therapeutic issues. Back to the board.
My idea for this hollow wooden surfboard was loosely based on a Geoff McCoy
Big Guy Nugget, a board that apparently has a mind of its own, and surfs itself
without any regard for the lack of skill of the rider. Sounds like me all over.
Check! A few rough measurements give or
take a few inches here and there to allow for mistakes made during lonely,
drunken building sessions on Saturday nights after Mrs. Wood Buddha has kicked
me out of the house on the count of my loud, drunken and out of tune renditions of the Sunnyboys' “Alone with You” . Damn it, there go those quotes again.
I made contact with a couple of other wooden surfboard building
enthusiasts for advice. I was lectured on the psychology of wooden surfboard
building and how the experience will make me a better person despite the fact
that it will take me three times as long as I had planned, I’ll use four times
as much wood as I had planned and I will have numerous tanties like my three
year old kid, throwing tools at my shed wall in fits of rage and frustration
because I forgot to measure twice and cut once and I will be constantly making
trips to restock my Paulownia timber cache. I’m not easily deterred, and
thanking said experts for their advice, I accept their blessing, hit the
road and take an oath to commit to this project through sickness and in health,
for richer or for poorer...blah, blah, blah.
I picked up some 150mm x 50mm Paulownia planks, rough sawn and straight as Hitler’s moustache. I
loaded the timber on the Buddha-Mobile roof racks and headed off to my Ashram to
begin the incarnation of my new wooden surfboard. Yeah baby! I am oozing with enthusiasm
but this too shall pass.
I designed the wooden surfboard using AKU Shaper and printed out the
templates with Hollow Board Template Maker allowing 24mm for the solid rails.
Stringer and ribs are 6mm Paulownia, the first inside rail band is 4mm
Paulownia with the remaining four rail bands being 5mm Paulownia. The deck and
hull skins are 6mm Paulownia. Paulownia has a tendency to split so to add some
strength to the stringer and ribs, I laminated one side with 4oz fibre glass
and epoxy resin.

Stringer and ribs, cut and shaped using a bandsaw and bench disc sander, with one side laminated with 4oz fibre glass and epoxy resin.

Gluing the ribs and stringer on my trusty jig using
Gorilla Snot (marine epoxy resin thickened with Aerosil). Gorilla snot works a
treat on the internal structural framing. White, light, and strong. Naturally
extracted. No gorillas were harmed in producing this product.

Gorilla snot in zip tied plastic bag for mess free and easy application. A great little piping bag technique I stole from a local pastry chef.

The application technique. I just cut off one of the corners of the plastic bag to let the snot ooze free.

Gluing and clamping the ribs. This is the view from the wooden surfboard
nose.

Gluing the centre top baton to the top of the stringer.
This is a 6mm x 20mm strip of paulownia running down the length of the board.
It effectively turns the stringer into a T-Beam and provides some additional
strength under the deck but is mainly used to add some stiffness to the frame
when I vacuum bag the deck and hull skins on.

Nose and tail blocks glued and two batons under the deck for additional support. The nose and tail blocks add a little extra weight (90 grams) but provide some added protection for the wooden surfboard especially since I’m a clumsy bastard and I am always dropping my boards. I’ve gotta stop drinking.

Ready for the first rail band.

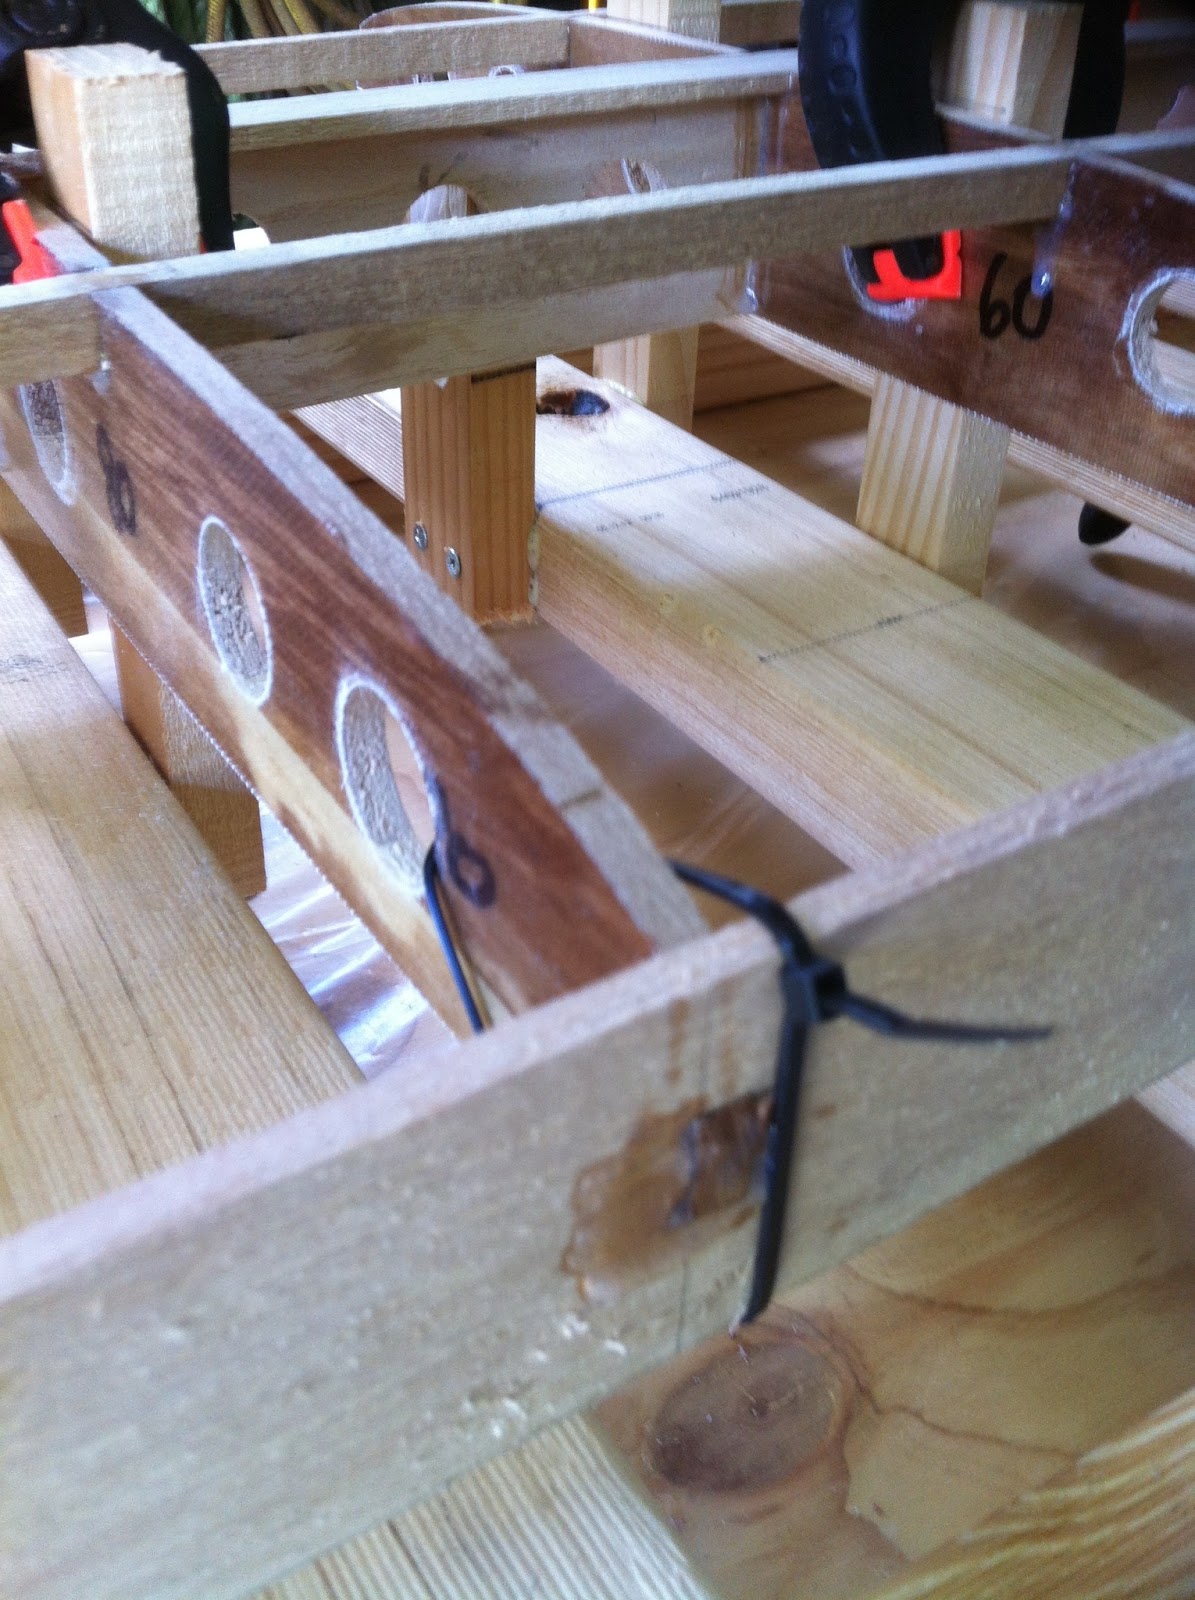
The first 4 mm rail band is glued. The timber is steamed to the radius of the nose and tail blocks using one of Mrs Wood Buddha’s damp face washers clamped to the wood for 10 minutes so the water penetrates into the timber. I then apply pressure with my hand to the rail end bending it to the contour of the nose or tail block as I heat it with her steam iron. I zip tie the ends to the frame for 24 hours and then glue the rail to the nose and tail blocks. Thin paulownia bends easily using this method.

View of the nose. The rail band is zip tied to the end of the ribs.

...and a closeup of the nose.

The view from the tail.

Bending and gluing the rail band for the opposite side.

Detail of the rail overlap joint at the tail bock.


The steaming, and bending process using Mrs. Wood
Buddha’s face washer and steam iron. She made me pay for that. Oh, how she made
me pay! I was a very naughty boy and had to go to her room ;-)
Gluing the ribs to the rail band. A mortise is cut in the
rail that aligns with the tenon on the end of the rib. The mortise can also be
drilled to the width of the tenon using a forstener bit. Not as neat but a lot
quicker and the gaps can be filled with Gorilla snot. Paulownia is a very soft
timber and cutting the mortises is best done with a razor sharp craft knife. My
chisels tend to tear the grain.

Shaping the rail band to the upper and lower contours of
the ribs using my trusty “Kunz Beaver Tail Palm Plane”. I’ve always wanted to
use “Beaver” and “Kunz” in the same sentence. :-)

Soaking up some rays outside the ashram waiting for the deck skin to go on. Weighing in at 1250 grams.

Using my thicknesser on the 150 mm x 6 mm paulownia boards. My home made "X" factor thicknesser stand folds away nice and flat in the ashram. I rip saw 12 mm x 150 mm boards from a 150 mm x 50 mm rough sawn plank with my band saw first and then use the thicknesser to profile the boards down to 6 mm.

Making the panels for the deck and hull skins. I clamp two of the 150 mm x 6 mm panels side by side with sash clamps and tape and glue the joins with polyurethane glue. I then place a sheet of plastic over the panel (minus the clamps) so glue doesn't make a mess, and then put a 600 mm x 2400 mm sheet of ply over that. I then weight it down with my special clamping bricks as the glue sets. It makes for a a nice flat panel 300 mm x 6 mm. I then repeat the process for two of the 300 mm panels to create a panel 600 mm wide. Polyurethane glue dries in a couple of hours and the panels are ready to go.

One of the panels ready to go. Note the blue paint on the end grain. This is so I can pattern match the wood grain of the panel.

Marking out the deck allowing for an extra 5 mm around the edge.

4 oz fibre-glass cut and ready for a coat of epoxy. The fibre-glass is applied to the underside of the deck for extra strength.
I squeegee the resin on and leave for about 40 minutes until it's not tacky.

I apply gorilla snot to the upper edges of the frame, and tape the deck skin in place. I also tape the hull skin in place without glue to provide support for the vacuum bag.

Then into the vacuum bag and bring the vacuum pressure down to 10 - 15 inches of mercury (Hg). My vacuum pump can pull almost 27 inches of Hg which will crush a hollow wooden surfboard (as I have learned from previous experience).

In the vacuum bag for 6 - 8 hours to allow for the epoxy to fully cure.

My trusty venturi vacuum pump that runs off my compressor. Available in kit form from the U S of A.

6 - 8 hours later and it's out of the vacuum bag.

Fibre-glassing the inside of the first rail band.

Gluing in paulownia wood blocks for the centre fin box and the side fin plugs using gorilla snot.

A view of the Goretex vented leash plug from the deck.


The air channels and hole for the Goretex vented leash plug. I added some grooves on the underside of the ribs for drainage, just in case any water manages to get in. Should this board ever leak, then the water can drain to the tail of the board. I'll just drill a drain hole through the tail of the board to let the water go free.

A view of the vent block towards the nose of the wooden surfboard. This is just under the deck skin. I installed a plastic vent with screw commonly used in windsurfing boards.


Ready for the hull skin. The same process that's used for the deck skin. A layer of 4 oz fibreglass, with epoxy resin and gorilla snot on the bottom edges of the frame. All the inside surfaces of the surfboard frame have been sealed with epoxy resin.

Then into the vacuum bag for 6 - 8 hours while the epoxy cures.
The next step is was to clean up the edges of the deck and hull skins with a hand plane and sanding block to get the board ready for the rail bands. Unfortunately I don't have any photos for this part of the process.

Gluing the the four 5 mm thick rail bands with Polyurethane glue on each side of the wooden surfboard. The 5 mm paulownia was a bit of a challenge to bend around the tail and nose of the surfboard even with the steam iron technique. I managed to snap a couple of the rails near the nose and tail. Easily fixed though. Just trimmed the rail band neatly back from the nose with a dovetail saw, cut a new piece of paulownia the replace the piece that broke, boiled the shit out it in a large saucepan for about 20 minutes, and the piece bent like butter. I made a jig to clamp it in place while it dried overnight. I then glued using the same jig to hold it in place. Thanks to Geoff Moase from Dovetail Surfboards for that little gem of advice. 4 mm rail strips are definitely the go.

The jig and strap.

Another shot of the rail bands going on. A very time consuming process.

The final rail band near the tail. I went for a 4 mm thick rail band to see whether it was easier to bend. And yes...it was!

Another shot of the final rail band going on. I went through a ton of masking tape to glue the rails on and thought there has to be a better way. On my next board, I will try using a timber jig cut to the outline of the board to hold the rails in place.

Trimming the the tops and bottoms of the rails to the contour of the wooden surfboard using my Number 220 Stanley Block Plane and Kunz Adjustable Spoke Shave. The surfboard is really starting to take shape. The glue join gaps between the rail bands will get filled with epoxy filler later.

Drilling the holes for the side fin plugs using a purpose made jig and 30 mm Forstener bit. Some masking tape around the area helps protect the timber from any potential slips.

A router and jig for the 10" fin box. A slightly nervous moment. Lots of meditation and measuring twice before I cut this slot. The good thing about this jig is that you can do a practice cut in the plywood base first and check this against the fin box for sizing.


Gluing the centre fin box using epoxy glue.

Shaping the rails with my trusty Kunz Adjustable Spoke Shave and 80 grit and 120 grit cloth backed sand paper.

After a final sand with 240 grit disk and my random orbit sander, the wooden surfboard is starting to take shape.

The view from the bottom. Still waiting to install the side fin plugs. This surfboard was shaped for a single fin so it shouldn't really need any side fins. The rail is quite sharp from the rear of the fin box to the back of the board as per Geoff McCoy's single fin shaping philosophy. And if you have any sense you don't fuck with Geoff's philosophy. I've installed them as an option should the arse of the board slide out.

Installing the side fin plugs using "Techniglue" an alternative to Gorilla snot. This product dries white which I think doesn't look as good as standard unthickened epoxy which dries clear. Horses for courses I guess. The cant and toe angles are copied from another 7'6" board I have. I know they work well on that board.


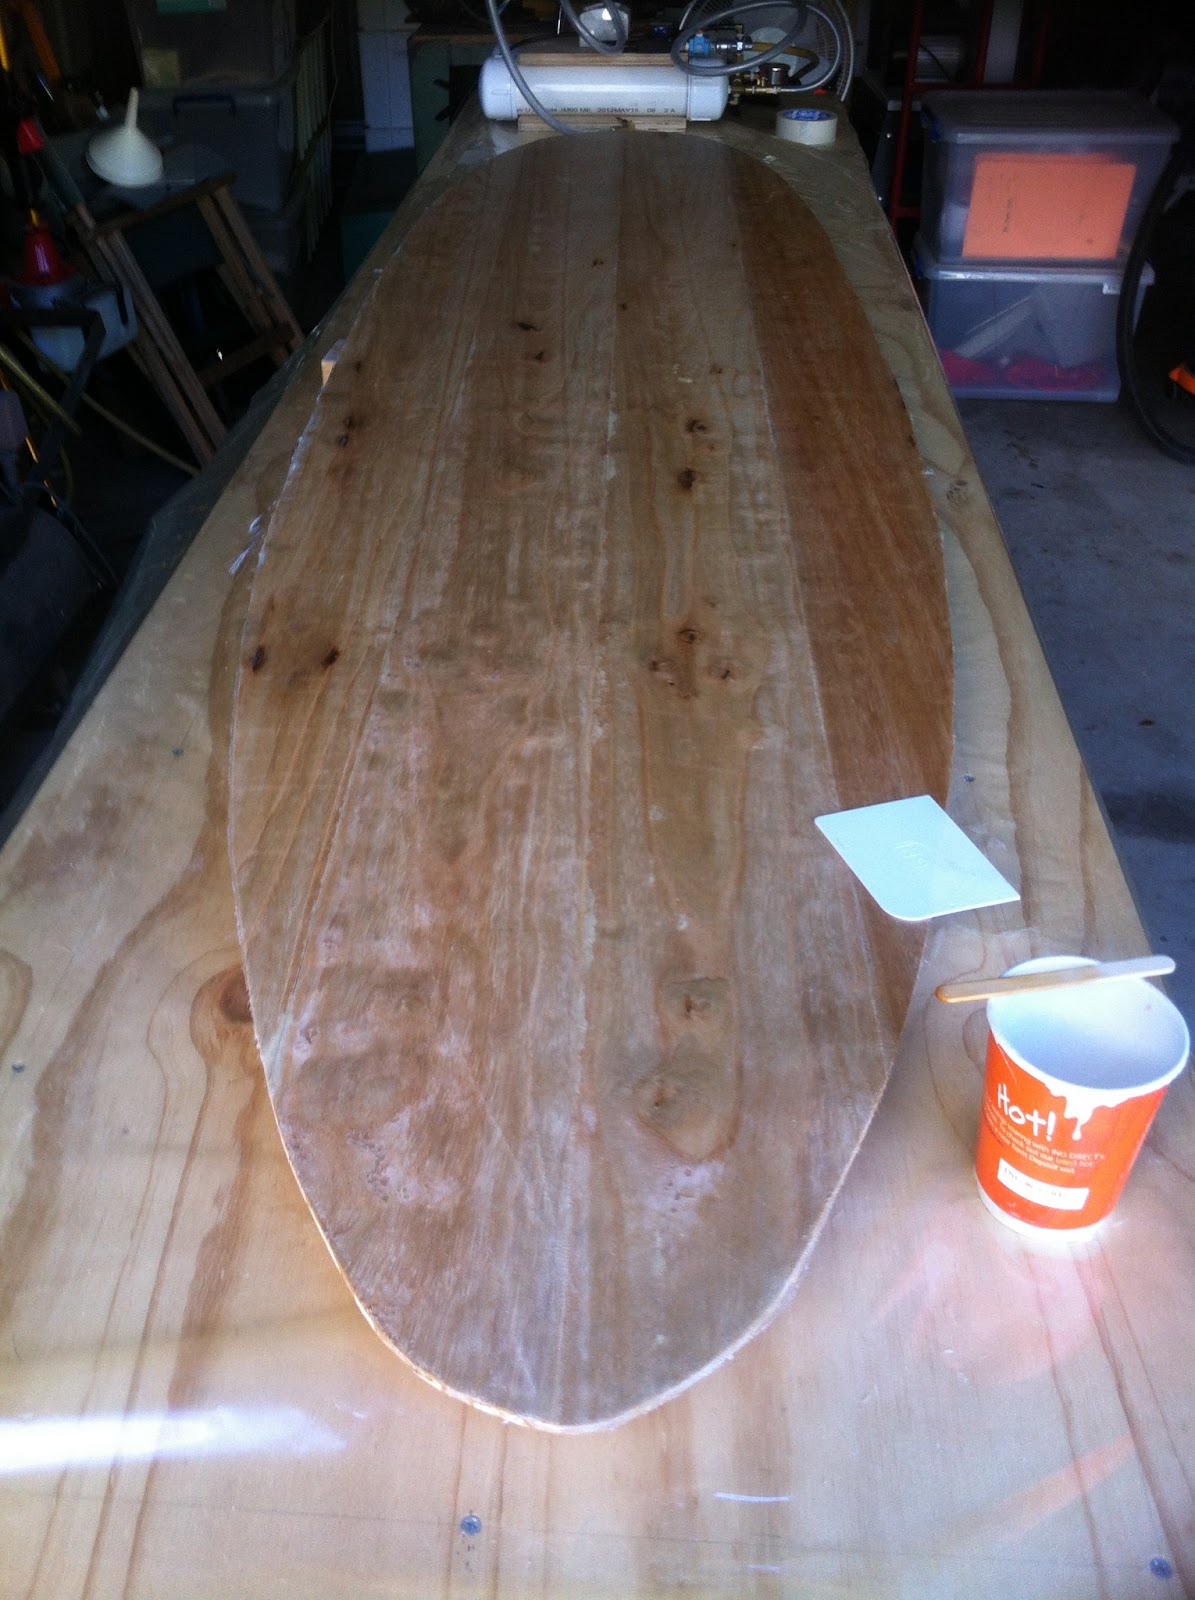
Two coats of resin later and the deck is done. I allow 24 hours drying time between coats.

The view of the underside of the tail with a custom made camphor laurel fin.

The view of the underside of the wooden surfboard with the fin installed and the epoxy dry. Niiiccce! If I must say so myself.

Catching some rays outside the ashram. Note the faded band lines across the timber on the deck. This is caused by the stickering timbers that are used to space the timber while it is drying. Apparently the supplier of this timber is now stickering his paulownia on its narrow edge to avoid these lines. It usually only occurs near the outside surface of the timber.


Cutting the fin from 8 mm thick camphor laurel. The timber was sourced from a fire wood pile on a farm in Northern New South Wales. I quarter sawed the logs which were about 200 mm in diameter, run the planks through my thicknesser and then cut the fin plan shapes out on my bandsaw.

Camphor laurel is listed as a noxious weed in Northern NSW so it's great to be putting this timber to good use. When cut, this wood fills the ashram with an amazing smell. It's truly a pleasure to work with. I foil the fins using some custom made hand tools and cloth backed sandpaper.

The starting point. A camphor laurel log.

Two layers of 4oz glass and epoxy resin on each side gives the wood additional strength and water resistance.

The fin after the final fill coat. It's just a matter of shaping the top of the fin that goes into the fin box, drilling the holes for the pin and bolt, gluing in the pin and fitting.
Surf Report
Well I managed to take Fat Rick out a couple of times for test runs and I was more that happy with its performance. It passed the "sink test" with flying colours and managed to stay afloat for both sessions which is not bad considering my weight (90kg). The board leaks a little bit, taking on about a quarter of cup of water over a 2 hour period. I did a leak test of the board after my first session, by coating the entire board with kids bubble mix and pumping compressed air into the air vent. I couldn't for the life of me see any bubbles forming on the outside of the board (indicating leaking air), near the timber seams, fin box, fin plugs and leash plugs so I can only assume that water is passed the screw plug seal in the air vent. I drilled a hole in the tail of the board to drain the water out. Sweet as.
The board floats me nicely, paddles easily, picks up waves easily and turns on a dime. During both sessions the surf was a little full, spilling and about 3' - 4'. I am very impressed with the dome bottom and fat tail and the board turns easily. Unfortunately on the first day I was the only one out which makes it pretty difficult to get any photos of it in action but I've included a photo to show the wave conditions on the day.


Hit my fin on the rocks. Bummer! I have some improvements in mind for version 2 of these wooden fins. This should add some strength to top of the fin that sits in the fin box. Stay tuned.
Looks awesome. Can you lend some advice on how you put together your vacuum pump ? I'm looking at doing the same but don't have a clue where to start.
ReplyDeleteDid you buy it as a kit ?
What materials do you need ?
Where do you buy the bits & pieces from ?
I've got a couple of builds on the go currently:
www.grainsurf.com/forum/viewtopic.php?f=11&t=5464
www.grainsurf.com/forum/viewtopic.php?f=11&t=5299
What a coincidence. I was looking at your Meyerhoffer build just recently. They’re a great board. I bought the 9'1" model a couple of years ago and couldn't stop surfing it. It was my favourite board for about a year. It turns on a dime and is very forgiving. Even managed to surf it up on the nose.
DeleteWith respect to the vacuum pump, the cheapest option was to buy a kit from these guys.
www.veneersupplies.com
http://www.veneersupplies.com/products/Project-V2-Auto-Cycling-Venturi-Vacuum-Press-Kit.html
They have a range of kits ranging from fully functional vacuum pumps to venturi kits that connect to a compressor. I went with the venturi option (240 volt) as I already had a compressor and the pumps won’t work in Oz because they are 110 volt systems. The company was very good to deal with and very helpful. Just email them with any questions. The kit was easy to put together and I got an electrician mate of mine to do the wiring for me. The instructions were easy to follow. The kit I bought will pull down a large bag for a 9’ – 10’ board in about 2 -3 minutes. Be careful when you use it because at full vacuum it will crush a hollow wooden board as I have learned from previous experience.
I got my vacuum bag tube material from another supplier. It was heaps cheaper than buying a bag from veneersupplies. I also bought the quick lock seals from these guys as well. From memory I think I bought the bag valves from veneersupplies.
http://www.acpsales.com/Vacuum-Bags-Films-Peel-Plys.html
Good luck. If you have any questions, just post them in the comments.
WB
BTW, there’s a guy on the Gold Coast called Grant Newby who builds mini simmons boards. It’s his trade mark. Not sure if you’ve heard of him.
http://surfboardsbygrantnewby.blogspot.com.au/
Fantastic. Puts it all into perspective. I'll email them and see what the Veneer Supply guys can do as an equivalant to ACP chaps.
DeleteI've not come across Grant Newby that I recall. But mind you I've looked at about 50 different sites in the last 12 months so may have glanced over he's in a hurry at some stage - he does good work!
I sincerly hope I make it to the Wooden Board Day at Currumbin this year - will keep an eye out for you.
BTW - good to hear about the Meyerhoffer. Can't wait to finish this off. Had screaming start to building it but recently life has got busy and have the Mrs. jumping up and down about some small renos!
DeleteGreat looking board and a very interesting write up of the build. I look forward to checking it out in the flesh in August.
ReplyDeleteHi
ReplyDeleteGreat job! I am in the process of starting my first build, please can you tell me if you would fit the fcs plugs before glassing ( cloth & resin) or after?
Thank you
Denis
Hi Denis,
DeleteThanks for the comments. In answer to your question, it depends on the fin system you use and also who you talk to. The most common fin system is the FCS style of fin plug. FCS recommends installing these after you fibre glass the board but before you sand the board. Here's a URL link to their fin install manual. Hope this helps and good luck with your build.
http://www.foamez.com/pdfs/FCSManual.pdf
WB
It looks great! Nothing like making your own board for surfing those waves! Bummer about the fin. Hope you found a good fix for it! Cheers!
ReplyDeletePriscila
Thanks Priscila. I sleep with the broken fin under my pillow in the hope that the fin fairy will leave me some money.
DeleteWB
This comment has been removed by a blog administrator.
ReplyDeleteI thought it was going to be some boring old post, but it really compensated for my time. I will post a link to this page on my blog. I am sure my visitors will find that very useful.
ReplyDeleteMini Malibu Surfboard & Wood Surfboard
Hi mate, great post!
ReplyDeletei'm building 2 similar boards with my gr 12 students at present and this has been a great help
got a problem with HBTM not working...some java security issue???
I was going to use brace ply for the frame but you have me wondering if it's thick enough for the skin to stick to??? Any wise advice??
Cheers
Dusty Waves
Happy to help. Drop me an email woodbuddha1@gmail.com
Deletegreat job !!! I love it, which it is the weight of the 7’6”?
ReplyDelete6.5kg
DeleteThis post's, inspired me.
ReplyDeleteSurfer Girls in ACTION!
Hi,
ReplyDeleteI'm building a timber Stand Up Paddle Board. Just wondering whether you coated the entire inside of the board with the epoxy resin or just the lower half? If it was the entire inside, how did you coat the top half, as I'm thinking it would make the timber too stiff if you applied it before glueing it in place and therefore wouldn't allow the timber to bend to the shape of the board. Would really appreciate your feedback.
I coated the entire inside of the board with 4oz fibre glass and epoxy resin. I allow the resin to cure for a 1-2 hours so that the panels don't become too stiff and then glue the top and bottom panels to the frame using thickened epoxy (epoxy mixed with a silica thickening agent).
DeleteHi Wood Buddha, thanks for this awesome post - I am currently making a hollow wood board for my HSC project. Just wondering what the silica thickening agent is called? And where you might buy it?
ReplyDeleteAlso wondering if it could have been made without a centre stringer - I keep reading that most people find hollow timber boards too stiff. Might omitting the stringer create more of a parabolic rail flex effect?
Thanks and Regards, Matt Reynolds
Hi Matt, I use a thickening agent called Carbosil. You can also use West System 411 filler which does the same thing https://shop.classic-boat-supplies.com.au/epoxy-resin/west-system-epoxy/west-system-411-adhesive-filler/
DeleteThere are guys that build their boards without a centre stringer and that does add a little flexibility. Wooden boards tend to be stiffer that PU/Glass boards but you can compensate for that by designing a little extra tail rocker in the board. There is an Irish guy who builds his board without any internal ribs and stringer to give his boards more flex. http://www.ohalloranboards.com/about.html
DeleteSorry mate I accidentally deleted your last comment about tail rocker. How much tail rocker is a really subjective topic. For a longboard I've added 1 - 1.5 inches. You might need to take a best guess and experiment. I would go with 1" for a smaller board.
DeleteMaybe try 1/2" to 3/4"
DeleteHi mate - looks the goods.
DeleteI have just finished sanding my first board and was interested in the resin process. I have been contemplating glass v resin and would prefer resin. What product did you use and keen for any tips as a first timer
Cheers
Todd
Namaste Todd, if the board is hollow and you've glassed the inside, you could finish the outside with just resin. Glass and resin will be stronger but heavier.
DeleteIf you haven't glassed the inside of the board then I would definitely use glass and resin on the outside. You'll need the extra strength if you want the board to last.
Hi - wondering what resin you used to finish the board. I have just finished sanding my board and I am contemplating glass v resin option. Would prefer resin only - some tips would be handy!
ReplyDeleteCheers
Todd
I use West System 105 resin and 206 slow hardener. You could also use the 209 extra slow hardener to give you a longer pot life.
DeleteI like your work. Do you have this kind of template by any chance?
ReplyDeleteCheers
I should be able to find it for you.
DeleteAs a more traditional furniture maker and woodworker, I find this just fascinating!
ReplyDeleteThx.
DeleteWoodbuddha, I'm interested in building my own board soon. From what I can tell I'm going to need a board that's at least 12'6 to 14' long, with at least 34" width and 5.5" thick
ReplyDeleteI weigh 275
That's a big board. I'd suggest hiring a couple of boards to get an idea of what size will suit you best.
DeleteHi Bhudda, this blog is awesome, especially your writing style, cracks me up.
ReplyDeleteI want to learn how to surf, as a guitar maker I should have enough skills to make my own so I want to do this, it will get 2 items ticked off the bucket list.
I am hopeless with computer software these days and don't want to take on a software sub that I won't get good use of.
I am looking for plans for a hollow board that suits a learner of 5'10" 15 stone, but I would rather laser cut the parts, have a laser cutter at work with a 600x300mm bed. But I cannot find a set of dxf files available anywhere. If you can help me please send any info to oneofmanystuartcampbells@yahoo.com
Thanks for the blog I'm having a rare tear reading it all.
Thx Stucam. I don't make hollow boards these days uI prefer to do foam core. Much simpler. I don't have the software to do DXF files for a CNC.
DeleteHello, my name is Stanislav. I am from Russia, I really want to try myself in assembling this board. Could you share some templates for this board? It is precisely the inner component
ReplyDeleteHello, my name is Stanislav. I am from Russia, I really want to try myself in assembling this board. Could you share some templates for this board? It is precisely the inner component
ReplyDeleteIf you can give me your email address on the comments I'll see if I can find it for you.
DeleteThis comment has been removed by a blog administrator.
ReplyDelete