
Paul with the Ying and the Yang.
Namaste Stick Strokers and welcome to this installment of building a foam core wooden short board called "The Yang". Confucius say, for every ying (or yin) there is a yang and for every yang there is a ying, It's okay to play with your own ying, but if you get caught touching someone else's yang, especially without their permission you're gonna can get into a whole heap of trouble. "So is there a ying for this yang Wood Buddha?" I hear you ask. Chit yeah! Read on Oh wise and noble reader and prepare to be enlightened.
My mate Paul has been watching my wooden board building escapades with curiosity for some time now. We are both very interested in sustainable surfboard construction and have been keen to see how wooden surfboards compare to their polyurethane fibreglass cousins in terms of performance. So how does a wood surfboard compare to a PU board of the exact same design? This is a great question and got us thinking about setting up an experiment. Could we design a board and build it using conventional polyurethane foam and fibreglass and also build the exact same board using wood and EPS foam for a performance comparison? The two surfboards could be surfed side by side by so to speak and compared.
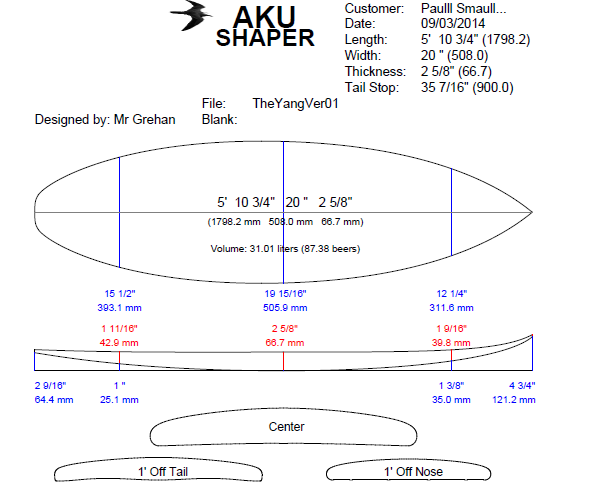
I'm always up for a challenge, so late in 2013 we set about designing a board in AKU Shaper for small to medium size surf that we could use as our lab rat. We had this design machine shaped for accuracy from a PU blank and had it glassed conventionally by Yoshi Takeda on Queensland's Gold Coast. Yoshi is well known for his glassing prowess and amazing tints and artwork. This board is called "The Ying". We also had the same design shaped on a machine from a high density (VH) EPS blank and this would be made into a wood skinned board called "The Yang". The two boards would be identical so a performance comparison could be made.
Cool idea, huh?
The design for "The Ying". The design was machined from PU and glassed using conventional surfboard construction techniques.

The design for "The Yang". Exactly the same as "The Ying" however the rails have been squared off and the overall thickness has been reduced to allow for the timber skins and rails. Once the timber is laminated onto the foam core, it will be the exact same dimensions as its PU cousin. We used a high density (VH) EPS blank for the board core.

The Ying.

Geoff Moase from Paulownia Timber Sales mentioned that he had some 10 mm x 150 mm rough sawn paulownia boards available. This size is perfect for thicknessing down to 5 mm or 6 mm boards for wood surfboards and it saves me re-sawing thicker timbers on my bandsaw. So I thought I would give them a go. The quality of this timber is superb. Clean, white and no knots.

Dressing the edges of the boards with my thicknesser. I screw the boards together at the ends and run them through my thicknesser to dress up the edges. Works a treat! The edges are perfectly square, ready for jointing them together into 600 mm panels. I also thickness these boards down to 5 mm.

Using the tape and hinge method for gluing the boards together to make 600 mm panels.

The panels glued and drying under a sheet of ply with special clamping bricks.

The foam core, kindly machine shaped by the guys at South Coast Foam.

Cleaning up and squaring off the rails with a sanding block.

Making a rail template from an old vinyl sign.

Gluing on the first tail piece. I use polyurethane glue for this.

Marking out the inside rails on a 5 mm paulownia panel. The paulownia is a soft timber and can be cut with a craft knife (with a bit of effort).

Trimming the tail piece. This is done once the glue has dried.

Wetting the tail end of the first rail band with a wet hand towel. I then use Mrs Wood Buddha's steam iron to bend the timber to the shape of the foam core and tape it in place for a couple of hours.

...and the same for the nose.
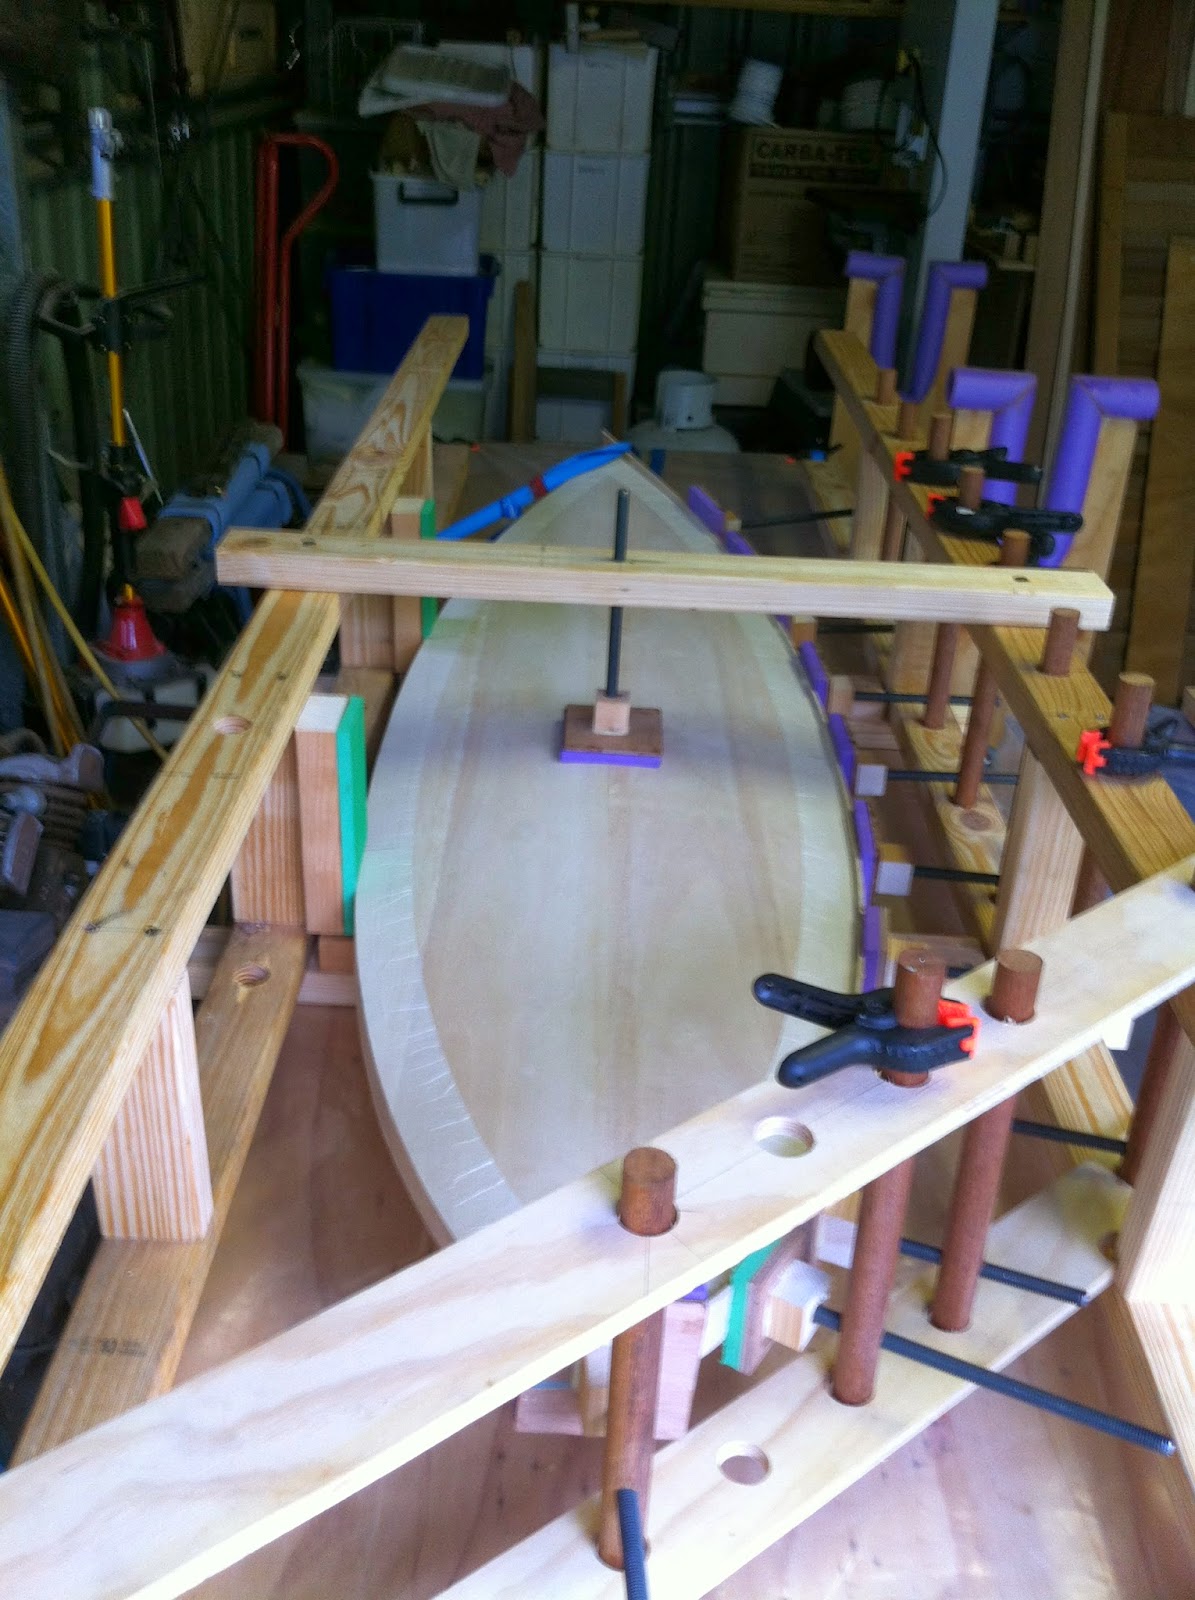
 A simple rocker jig made from scrap pine and 6 mm bracing ply. This is used to keep the board rocker true while gluing on the inner rail band and the deck and hull skins.

The first rail band glued and taped in place. The PU glue is dry in a few hours.

Wetting and steaming the rail ends of the opposite inside rail.

The second inside rail band glued and taped in place.

I use a small 6 gauge screw to fix the rail to the tail block while the glue dries. It's removed once the glue is dry. The hole will be filled with glue and covered by the outside rail bands.

Trimming the rails back to the bottom and top contours of the foam core with my Kunz Beaver Tail Palm Plane, my favourite tool.

A close up of the nose after trimming. The gap that you see will be filled with frothing PU glue when the top and bottom skins are glued in place.

...and the tail.
 Spring clamps hold the board in position while I mark out the deck and hull skins. I allow a 5 mm overlap.
 Marking the outline of the hull skin at the tail.
 Cutting the deck and hull skins out using a sharp craft knife.
 The skins cut and ready for sanding.
 Sanding the skins using a random orbital sander. I do a rough sand on both sides with a 60 grit disk. Then I sand the side that will face outwards (the good side) with a 120 grit disk and then a final sand using a 180 grit disk.
 Taping up the joints and any knot holes with masking tape. This prevents any glue from oozing out and staining the timber during the vacuum bagging process.
 Applying the polyurethane glue (Fix It Mate FMP 200). I squeegee the glue on the both sides of the foam, and mist it lightly with water from a spray bottle.
 I then tape the deck and hull skins in place over the foam core to hold everything in place while I slip the whole board into the vacuum bag.
 Sealing up the bag and placing the whole thing on the rocker table. I use some bricks to hold the board down so that it fits snugly on the rocker table. I then suck the bejesus out of it (20" Hg) and leave it to cure for 2 -3 hours depending on the temperature.
 The hose connection on the vacuum bag.
 ***Out of the bag after 2 - 3 hours.
 A view of the tail. You can see how the deck skin has curved to the contour of the foam blank.
 A view of the nose. I sand the deck and hull skins to a taper (2 - 3 mm) before gluing to allow them to form evenly to the nose rocker of the board.
 The double concave at the tail.
 Trimming and sanding the edges of the board using a combination of palm planes and sanding blocks.
 Getting a big hug from the giving tree and ready for the rail bands.

Taping the top and bottom skins near the rails helps protect the timber from glue spills.

 Cutting out the paulownia rails.
 And some Suriname Cedar rails which will be used as a feature.
 The top timber panel tends to separate at the centre joint during the vacuum bagging process particularly if the nose of the board has a bit of rocker. I like to put a small diamond piece to cover the gap.
 Gluing in the new piece with polyurethane glue.
 After the glue has dried.
 Some sanding and it looks a million bucks. Well l I think so!
 Marking off the rounded square tail. It's going to be interesting getting the rails to bend around this curve.
 The tail after some sanding. Ready for the first 4 mm paulownia rail band.
So the next heap of photos shows the build process for the rails. It's a bit tedious but I like to document my surfboard builds in detail. The first two rails on each side of the board will be 4 mm paulownia. The second two rails on each side of the board will be 3 mm Suriname Cedar veneer. All up the total thickness of the outer rail is 14 mm.
 Steaming the first paulownia rail for about 15 - 20 minutes.
 I've clamped the rail in my latest invention. I like to call it the rail-o-mater.
 The foam pads provide an even clamping pressure holding the rail to the board.
 I leave the rail in the jig for about 2 - 4 hours.
 I then release the rail out of the jig, apply polyurethane glue to the inside surface of the rail and clamp it back in the jig for 2 - 3 hours while the glue dries.
 This clamping pad provides downward pressure on the board holding it nice and tight in the jig.
 A luggage strap holds the rail nice and tight at the board nose.
 After the glue has dried, I remove the board from the jig and trim the tail and nose using a fine dovetail saw and a sanding block.
 A photo of the nose after trimming. I am very impressed with how this jig works. The rail joints appear very crisp and it makes an easy job of working with the rails. It also helps with reducing waste from masking tape. The rail jig cost less than $100 to make.
 Steaming the rail for the other side of the board.
 The rail for the other side of the board is clamped in place after steaming.
 A nice tight overlap joint at the tail. I am surprised at how well the rail bends around the tail of the board. Steaming the rail helps.
 A wooden wedge helps apply a little extra pressure at the tail.
 A luggage strap helps to hold the rail at the nose end of the board.

Trimming the nose.

...and the tail.
 Rail number three. The stainless steel ruler helps support the rail through the bend and stops it from breaking.
 Rail number three before trimming.
 The nose before trimming.
 While I was building the Yang, Paul showed up with the Ying. Yoshi Takeda had just finished polishing the gloss coat that morning. The tint work is amazing. It's a shame we 're going to wax this puppy up, but it's all in the name of surf science.
 Gluing rail number four.
 Using the stainless steel ruler again to support the bending rail.
 Strapping in the rail at the nose.
 The tail ready for a trim.
 ...and the nose.
 All trimmed up. Nice and neat.
 The tail is done and now it's time for the cedar rails.
 Gluing the first two cedar rails to the right hand side of the board. These were done two at a time and were steamed first. The cedar rails are 3 mm thick and are rotary peeled from a log. This makes them a bit of a challenge to work with as they tend to warp and twist.

That stainless steel ruler sure is handy for bending timer.
 A luggage strap to hold the rail in place at the nose of the board.
 Trimming the rail at the nose after the glue has dried. Polyurethane glue only takes a couple of hours to cure.
 The tail before trimming.
 Steaming the last of the cedar rails.
 Waiting for the glue to cure.
 A closeup of the nose.
 ...and the tail.
 The nose all trimmed up.
 The tail ready for a trim.
 Trimming the top and bottom edges of the rails. I like to leave the masking tape on as it protects the timber from tool marks.
 A sharp spoke shave and palm plane make quick work of this job. I take my time and find this part of the process is very meditative.
 My little 5 year old apprentice with a dust brush. Usually he has a claw hammer and is on a search and destroy mission.

Some nice detail at the nose.

...and the tail.

The next step is the fun bit - shaping the rails.
 I shape the rails with a spoke shave and 80 grit sandpaper on a foam pad. I then finish sand the whole board in 180 grit sandpaper. Shaping the rails usually takes me about 6 - 8 hours.
 Ready for the first coat of epoxy on the top of the board. I haven't used West System resin before so this was a first for me. West System also have a 207 hardener which is specifically designed for wood.
 I tape up the bottom so that I get a nice clean resin line.
 I apply the resin using a squeegee and then use a gloss foam roller to get an even layer of resin over the whole board. I use a foam brush to get rid of any bubbles on the surface of the resin. The colour of the timber really pops out once the epoxy is applied. The paulownia turns a honey gold colour and the Suriname Cedar is rich brown and bronze depending on the light. I use 60 grams of resin on the top of the board and 60 grams on the bottom for the first coat.
 The bottom of the board before the epoxy coat.
 ...and after.
 Marking out the Futures fin box slots.
 Marking out the hole for the leash plug.
 My custom made Futures template. I wasn't keen on spending $150 for an authentic Futures jig and installation kit. Instead I made up a simple jig and used a 16 mm straight router ($11) bit and a 32 mm rabbeting bit ($22).
 Routing out the slots for the fin boxes. An interesting thing about Futures fins is that you don't have to allow for any cant in the fin boxes. The cant is built into the fins themselves. The fin boxes are mounted perpendicular to the bottom plane of the board.
 A close up of the fin slot.
 I then seal the timber in and around the fin slot with some epoxy resin.
 Drilling the hole for the leash plug. Paul wanted a heavy duty leash plug for this board hence the 35 mm hole.
 I also seal up the timber around the leash plug hole with some epoxy.
 Gluing in the fin boxes with black tinted epoxy resin. The resin is also thickened slightly with Carbosil a silicon based thickening agent.
 Gluing in the leash plug.
 After the resin has dried, I sand back the fin plugs flush with the bottom of the board. I found installing the the Futures fin plugs a little bit fiddly and not as easy as the FCS type plugs.
 The same for the leash plug.
 The Swedes sure make a mighty fine pear cider by the way.
 Paul giving the whole board a wet rub with 240 grit wet and dry paper before the final epoxy coat.


 The Ying and the Yang.
 A final coat of epoxy on the top and bottom. 40 grams of epoxy on each side.


 ...and he can't wait to get his new woody wet.
Taping the top and bottom skins near the rails helps protect the timber from glue spills.
So the next heap of photos shows the build process for the rails. It's a bit tedious but I like to document my surfboard builds in detail. The first two rails on each side of the board will be 4 mm paulownia. The second two rails on each side of the board will be 3 mm Suriname Cedar veneer. All up the total thickness of the outer rail is 14 mm.
...and the tail.
That stainless steel ruler sure is handy for bending timer.
...and the tail.
The next step is the fun bit - shaping the rails.
I can confirm the Yang is an awesome piece of craftsmanship, almost too good to surf....almost (I don't think you can just look at a board and not surf it). Both boards are very different but very good fun. As for sustainability, hands down the Yang wins on all counts. Thanks Wood Buddha - you have a convert here !!!
ReplyDeleteOutstanding. Do post the surf report - I'd be very interested in how they compare!
ReplyDeleteVery clean construction, well impressed!
yes.... a very informative building process, thanks. As a chambered method devotee myself I find it very interesting what u hollow wood lads are up to. cheers.
ReplyDeleteFantastic build, board looks awesome.
ReplyDeleteI build foam core Paulownia boards as well and have struggled with the rails. Your jig looks great. Am I able to copy it? If so how do the clamps work, they look like dowels (vertical and horizontal) but I cant figure out how you tighten them and keep them tight.
Sure. Drop me an email with any questions regarding the rail jig setup.
DeleteBeautiful board. What foam density do you use for the core?
ReplyDeleteVery hard VH the highest density available.
ReplyDeleteWhat is the weight of the board? Isn't it too heavy for a shortboard?
Deletehi,
ReplyDeletei´ve got a board like that, a 6`1, it´s 400 grams more heavy, like usually, but in some cases it´s better like that, pefect for hollow barrels, and shoppy cond. i love it, it never snaps! looks same after 3 winter!
i´ve got a board like that, a 6`1, it´s 400 grams more heavy, like usually, but in some cases it´s better like that, good on shoppy days, perfect in hollow barrels, never snaps, looks same after 3 winter!!! i love it...
ReplyDeleteHey Man, beautiful work, congrats!!! I would like to know two things if you don't mind answering.
ReplyDelete1) Comparing both boards on surfing, which are the main differences you could tell us about each one?
2) You know the weight of each board? The wooden board got too much heavier than it's original one?