
Namaste Wood Butchers and welcome to this instalment of "Building a Hypto Crypto Timbo" by Steve Hann. As many of you would have gathered by now (including Misses Wood Buddha), I am a lazy knuckle dragging troglodyte and although I am no cave dweller, the Wood Buddha's ashram does bear some resemblance to the stone nests of my forefathers. Perception is a very subjective thing. For instance, when I look in the mirror I see a well tuned highly motivated example of manhood. On the other hand, Mrs. Wood Buddha would describe me as a forgetful, sad excuse for an adult who still doesn't want to do the dishes. In fact she refers to me as her third child. Sure I forget where I put my car keys, and I keep losing my wallet but if I was meant to remember where my stuff is, God would have given me a brain....that didn't quite come out the way I meant it to.
Anyway, back to my laziness. Oh yeah. Steve Hann, a fellow wooden board builder and teacher from Noosa sent me some photos and a write up of his most recent build, the Hypto Krypto Timbo. A very slick looking machine indeed. The fact that Steve did the write up of the build is awesome as it saved me hours of typing and callouses on my tender little digits. Onya mate. In all seriousness, it's great to see people getting so stoked about building wooden surfboards. Hopefully this will fuel the stoke for a few more of you out there.
You can catch more of Steve's work on Instagram.
https://www.instagram.com/green_stix/
Over to you Steve.
Being a carpenter for over 20 years and a surfer for 30 years, I guess it was only a matter of time till I turned my hand at building timber surfboards. I’ve always had a love for recycled timber and furniture construction given the sheer weight of it, combined with a house full of the stuff, my love for building it was becoming limited. I had often thought about doing a board building course one day, however I wasn’t a fan of the cost of them. A while ago I was delving into the world of google and happened across a HWS (Hollow Wood Surfboard) site, followed by another, and another and down the rabbit hole I went. I wasn’t too far down that hole that the light bulb came on and I thought to myself, “I don’t need anyone to teach me, I already have those skills!” As a result, the next 100 hours or so on the internet was purely devoted to HWS research. The following is a progression of my first HWS – based on a HS Hypto Krypto (I did this so I would have a direct comparison as I owned a real Hypto).

Prior to cutting the first stick of paulownia, it was almost imperative that I learn a surfboard shaping program. Well, maybe not imperative as there are plenty of guys that don’t use one however, I found it makes my life much easier shaping in virtual reality first. Two reasons, the first being it makes it very easy to copy an existing board from google images (which I recommend till you have a better idea of what you are doing), secondly it gives you other options down the track should you want to rebuild the same board, tweak it, build a compsand etc.
After some more googleing I settled on AKUshaper as I liked the look of the interface and secondly “Wood Buddah” has a cracking blog post on learning it. I managed to shape my first board within 3hrs of downloading the program. The bonus is too, for a backyard hack like me it only costs $7/month.
Once my hypto was shaped in virtual reality I printed out the templates via “hollow board template maker” (free download), over a lot of A3 pages. From here, I spray adhesive the templates to the paulownia and cut on the bandsaw. For this board I used a 7mm stringer with 6mm rails, however now I find that 5mm everything for the internal frame is adequate.
As for glue, many guys have different opinions from being green through to finding the best stuff that sticks. I use titebond 3 on any large gluing areas (the greeny in me – and it’s a great glue). For any on edge glueing I use AV515 which from my furniture building sticks like s#!T to a blanket.

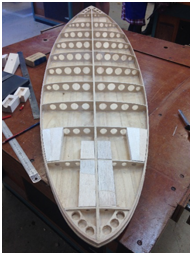
The rocker table: I learnt from experience that a good rocker table is one of the most important things you need to build a HWS. I initially overlooked the importance of this which resulted in me having to rebuild the frame as the first one came out all twisted. I combined a number of ideas off the net to come up with my own system – the only downside is that I have to half rebuild a new table with every new shaped board (but it works for me and keeps my boards straight as a die). I glue the whole frame up with AV515. The way I glued the rails on this board is different to the technique I now use.

For this board I glued the outer frame rails, followed by skinning the bottom, adding internals (fin supports etc), skinning the top, then adding the outer rails. I have since found it easier (for me) to glue on all outer rails, then shape to the board frame, then add the skins. In the pics below I also filled some of the compartments with spray foam which I no longer do both for environmental reasons and that it’s not necessary. Be prepared to buy lots of clamps too.


Rail Bands: This was the hardest part of the build for me. For each band I had to steam, clamp 24hrs, glue, clamp another 24hrs. 2 days per rail x 8 rails took ages. Also despite a Bunnings store worth of ratchet straps it was all but impossible to get every rail super tight. As a result I ended up with a few gaps – not that it mattered as they just fill with resin, and I have black rails so you can’t see them anyway.


Once the rails were all on, came many hours of shaping. I’m a lover of Japanese tools and can’t go past how good a timber block plane is for shaping. My plane has rocker built into it so can get into any spot on the HWS.

I shape the rails square first followed by actual rail shaping. This took around 6 hours for this board.

With the board shaped, I used a vinyl cutter to recreate my own version of the Hypto logos. SH are my initials so it made it easy to rejig the HS logo. Look closely at the pics for other subtle changes from original logos. After cutting the logos on the vinyl cutter I used a gel wood stain directly on the timber.

Initially I planned to have someone glass my boards but given quotes of $600-$700 per board I soon realised that I would be learning the art of glassing. More research, more questions, more trials and errors later I got the hang of it – surprisingly fairly quickly too. I now actually find the glassing to be one of the more enjoyable parts board of building (except for the sanding – that sucks no matter what the material).
I chose to go with “gearbox” for the fin box install as they are a fraction the cost of futures and FCS, in addition you can customise the boxes to take timber so they suit HWS perfectly. I also find them a great system to install not to mention they would easily rival the main brands for strength.


The finished board including vent screw and leash plug.

In conclusion, the board surf’s great and is super fast down the line. It does lack in flex so it’s harder to get it to snap of the lip but on a point break this board tears it up. As for me I have the bug, I’m onto my 7th board and now exploring the world of compsand board building. For further info on any my builds you can find me on Instagram under my profile green_stix.
a great yarn - informative and entertaining Cheers from the BrineCave
ReplyDeleteThanks for dropping by, Briney.
DeleteThis comment has been removed by a blog administrator.
DeleteNice design.
ReplyDeleteSurfer Girls in ACTION!
Uau thats the board that I want to shape as my first wooden surfboard. Do u have a tutorial on how did u do on the AKU Shaper?
ReplyDeleteI want to do the 5´4 19 1/2 2/14 26liters.
Did work well in the water?
contact me on email woodbuddha1@gmail.com
Delete