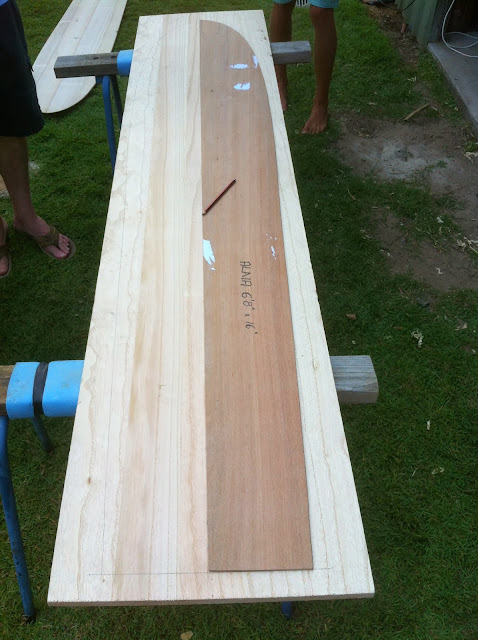
Namaste Budding Board Builders and welcome to this installment of shaping an alaia. I had a visit from Jarred and his old man Bruce a couple of weeks ago. I work with Bruce and he'd caught wind of the fact that I'm into building wooden surfboards. His son Jarred had picked up an alaia blank and was keen to get it shaped but had no access to a workshop and tools so I offered to give him a hand.
Building an alaia is a great way of getting into wooden surfboard building. They are fairly simple to build and you only need a few basis tools like a jigsaw/coping saw, a hand plane and sand paper/orbital sander. One of the first wooden boards I built was an alaia. I'd sourced some rough sawn paulownia planks from a plantation near Mount Warning, thicknessed them and glued them together to make a blank. Alaia blanks weren't available in those days but I wish they were. It would have saved me some work. These days you can buy an alaia blank from a number of suppliers and they will post them to your door. I cut the outline using a jigsaw (I didn't have a band saw in those days) and shaped the board using an old Stanley hand plane, a spoon plane and an orbital sander.
One of the things that fascinated me about finless surfboards was their hydrodynamics and how they managed to hold a line on a wave face. Tom Wegener, the man who led the finless surfboard revival explains the concepts really well in an interview from the Alley Fish Fry in 2011.
Here's a video of Tom Wegener at the 2011 Fish Fry explaining the hydrodynamics of the Alaia. His explanation starts at 1:22 into the video.
Firstly we measured the centre of the blank at both ends and used a straight edge to mark the centre of the plank length ways. I had a template from my alaia lying around so we used that to mark the outline. First the left hand side.
....and then we flipped the template over to mark the right hand side.
Then to the bandsaw to cut the outline. A jigsaw works fine also.
The outline cut. Rough as.
Ready for some trimming with my palm planes and my bench sander.
The board ready for final shaping. A very happy chappy. I think he's hooked.
A concave from the nose to the tail, a slight chine rail along the bottom of the rails and a slight taper under the nose.
This photo shows the bottom rail-to-rail concave of my board. This runs from the tail of the board to just short of the nose.
My alaia leaning against some green. Getting a big hug from the "Giving Tree".
A sideways view of the nose. The bottom of the board is facing upwards.
This photo shows the bottom rail-to-rail concave of my board. This runs from the tail of the board to just short of the nose.
A sideways view of the nose. The bottom of the board is facing upwards.
A spoon plane or pull shave is a great little tool to carve out the concave. Jarred borrowed mine to finish his board and used an orbital sander to give it a final sand.
The board finished complete with artwork.


I have seen wooden boards in the Philippines once when I went there. The thing is, they are made of bamboo. It is actually a good board that is easy to maneuver along the waves. It catches on the waves pretty easily too. Problem is, it is prone to nosediving. :)
ReplyDelete- ToolCenter.com
Aloha!
ReplyDeleteJust read your blog from 2013, great footage of Wegener by the way, and am keen to build an Alaia.
I noticed the picture of your Alaia Template in the blog post, and was wondering how you came about it.
Any help you can give would be greatly appreciated.
Mahalo nui loa,
Todd Barrett
Keauhou, HI
todd@alohatodd.com